Microbit
Microbit Introduction & Overview
What is a Microbit?
The BBC micro:bit is a pocket-sized computer that introduces you to how software and hardware work together. It has an LED light display, buttons, sensors and many input/output features that, when programmed, let it interact with you and your world.
It has built in Bluetooth , motion detection, a compass, and an LED display.
You can use your BBC micro:bit for all sorts of cool creations, from robots to musical instruments – the possibilities are endless. This little device has an awful lot of features, like 25 red LED lights that can flash messages. There are two programmable buttons that can be used to control games or pause and skip songs on a playlist. BBC micro:bit can detect motion and tell you which direction you’re heading in, and it can use a low energy Bluetooth connection to interact with other devices and the Internet.
Powering the Microbit
You have your program running on your micro:bit, but it is still tethered to your computer. There are a number of ways to solve this problem and power the microbit. Following are some of the ways.
- Option-1: AAA Battery Holder with JST Connector:
The most obvious common and convenient of powering the BBC microbit would be the on-board JST connector. A simple 2xAAA battery holder with JST connector can be used. It has an M3 mounting hole in the centre which makes it perfect for use with our Acrylic protector case as below. With this option the BBC microbit is powered and protected whilst still allowing access to the micro bit breakout board.
With this option the BBC microbit is powered and protected whilst still allowing access to the micro bit breakout board.

- Option-2: Micro USB:
The on-board micro USB connector whilst very commonly available is not a very portable solution but could be of great use for projects where the BBC microbit stays in the same location.

- Option-3: GPIO Pins:
There are some other options available for powering your BBC microbit, including the clearly marked 3V and 0V GPIO pins on the edge connector of the board.
Program
Tell your micro:bit what to do by giving it instructions. Sets of instructions for computers are called programs and are written in code.
You can program your micro:bit in the online MakeCode block or Python text editors. Let’s code helps you choose the one that’s right for you.
To access an editor you need either:
- A computer with a web browser and internet access or
- A mobile device with the free micro:bit app for Android phones and tablets or iOS (iPhone and iPad) – MakeCode available only
Then you’ll need to transfer your program onto the micro:bit to make it work.
Connect
To make your micro:bit work you need to copy your code from the editor to the device.
Connect your micro:bit to your computer or mobile device. You will need:
- Computer – use a USB cable to connect to your micro:bit
- Mobile apps – use Bluetooth to connect your micro:bit to your phone or tablet
Transfer from a computer
Transferring your program to your micro:bit is called flashing because it copies your program into the micro:bit’s flash memory.
Your micro:bit will pause and the yellow LED on the back will blink while your program is being transferred. Once it’s copied across, your program starts running on your micro:bit.
There are two ways to transfer your program:
- Drag and drop works like copying a downloaded file from your computer to a USB memory stick. It works on any computer.
- Direct flashing sends your program directly from the code editor to your micro:bit. It works on two popular web browsers.
Drag and drop
When you plug the micro:bit into your computer’s USB socket, it will appear like a USB memory stick called MICROBIT.
Download your program as a .hex file from the code editor to your computer, usually to your downloads folder. Then drag and drop it onto the MICROBIT drive.
See how it works in:
MacOS
Chrome OS
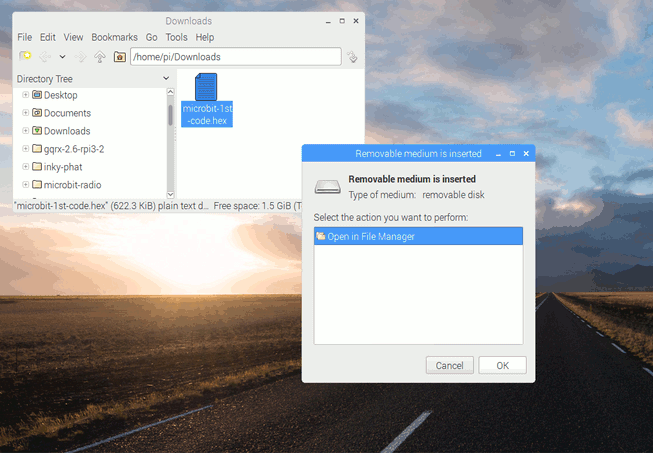
Linux
Direct flashing
You can send programs direct from the online code editors to your micro:bit without the need to download and copy a .hex file. You’ll need to use the editors in a recent Chrome or Edge web browser for this to work. You may need to update your micro:bit firmware to allow direct flashing, if you got the device a long time ago.
Note: direct flashing is quick and easy, but it does not save a copy of your program on your computer. If keeping a copy of your code on your computer or local network drives is important to you, use drag and drop instead.
Direct flashing from MakeCode
Direct flashing from Python
Transfer from mobile app
To get started on mobile, you need to download the micro:bit mobile app to your phone or tablet and follow the on-screen instructions. The apps use Bluetooth to transfer your code to your micro:bit, so you need to enable Bluetooth on your phone or tablet.
These videos help you understand how the mobile apps work with your micro:bit.